
Deploy
The following guide for SvelteStart will walk you through setting up the app on a Platform-As-A-Service (PAAS) called Dokploy. While you can deploy your app to a hosting provider like Vercel or Netlify which makes the build/deploy process very easy, using a self-hosted open-source PAAS like Dokploy or Coolify on a virtual private server (VPS) offers many benefits. This includes having more control over the deployment process and cutting down on costs. The main drawback is that you miss out on Vercel's global CDN (caches static files) and edge network (moves compute closer to users) which provides better performance and more redundancy. However, you can still achieve horizontal scaling with Dokploy via clusters (albeit with more effort on your part).
Note that we focus on deployment before anything else because configuring other things like databases and auth will involve setup steps for staging and production environments. If you prefer, you could skip those steps when you encounter them in the guides and focus on setting up the development environment for now. In that case, proceed to the next guide on setting up your database.
Install Dokploy on your VPS
First, you need to rent a VPS from a provider like Hostinger or DigitalOcean. See the list of compatible Linux Distros for Dokploy here, and take note of the minimum requirements (2GB ram and 30GB disk space). Then once you've SSHed into your VPS, run the command to install Dokploy:
curl -sSL https://dokploy.com/install.sh | sh Now open up your web browser and navigate to http://your-ip-from-your-vps:3000 to open Dokploy.
Note that you should also take steps to secure your server.
Before you begin deploying, you need to link up your GitHub account with your Dokploy instance so that it can automatically pull your code and deploy when you push code. To do this, go to the 'Git' page, click on GitHub, and grant necessary permissions.
Deploy the app
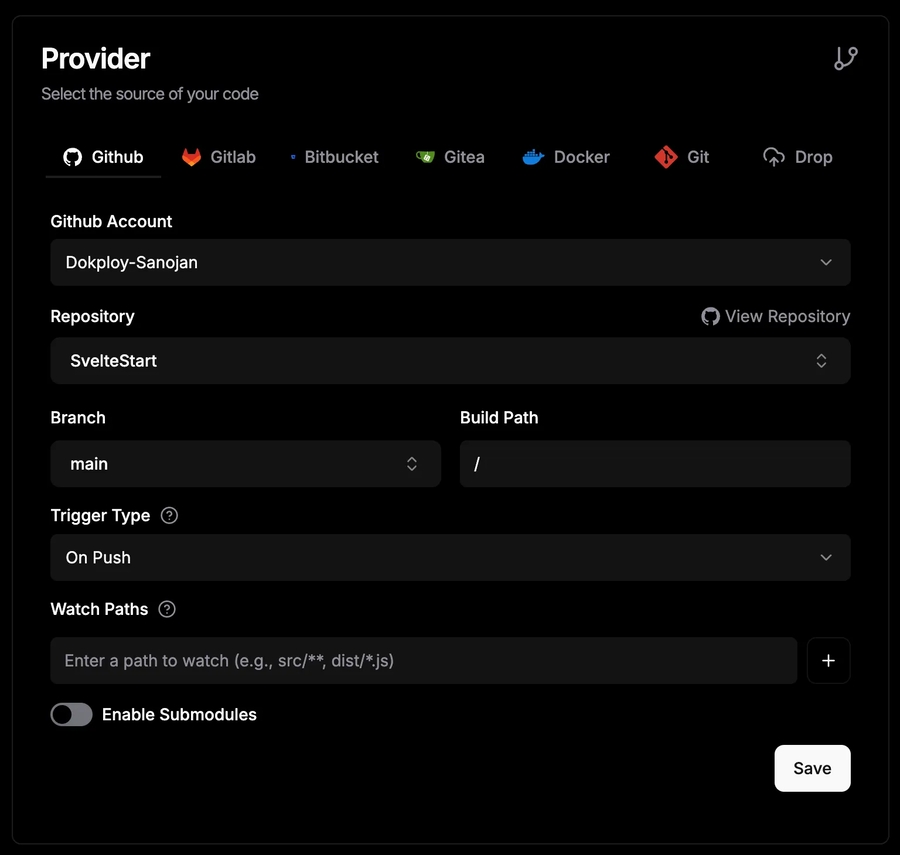
Now you're ready to deploy the app. In the 'Projects' page, create a new project with the name of your app. Once inside, create a service called 'app-production'. When you click on the newly created service, fill in the Git provider details like below:
Then go to the 'Environment' tab and paste in the following:
# ===== CORE =====
PUBLIC_FRONTEND_URL=https://your-domain.com
NODE_ENV=production
DATABASE_URL=" "
REDIS_URL=" "

# ===== AUTH =====
GITHUB_CLIENT_ID=" "
GITHUB_CLIENT_SECRET=" "
GOOGLE_CLIENT_ID=" "
GOOGLE_CLIENT_SECRET=" "
BETTER_AUTH_SECRET=" "
BETTER_AUTH_URL="https://your-domain.com"

# ===== STORAGE =====
BACKBLAZE_APPLICATION_KEY_ID=" "
BACKBLAZE_APPLICATION_KEY=" "

# ===== MAIL ======
ZEPTOMAIL_MAIL_TOKEN=" "

# ===== BILLING =====
STRIPE_API_KEY=" "
STRIPE_WEBHOOK_SECRET=" "

# ===== MONITORING ======
UMAMI_URL="https://your-umami-domain"
UMAMI_WEBSITE_ID=" "

# ===== SECURITY =====
TURNSTILE_SECRET_KEY=" "
PUBLIC_TURNSTILE_SITE_KEY=" "
RATE_LIMITER_SECRET=" "
Note that besides the first two variables, you won't know the rest yet. We'll start to fill them up as we progress through the guides.
You can trigger a manual deployment now by clicking the 'Deploy' button. In practice, it will auto-deploy when you push or merge code into your main branch.
To view the app, you'll need to configure a domain for the service. Ideally, you want this to be a custom domain, but you can use a temporary one for now. Go to the 'Domains' tab and add a new domain. Here, you enter your domain under 'Host'. If you don't yet have one, generate a traefik.me domain by clicking on the dice button. Next, toggle on HTTPS and select "Let's Encrypt" as the certificate provider. Then hit 'Create' to add the domain.
If you're using a custom domain, you'll need to configure it's DNS settings. Go to your domain registrar and navigate to the DNS settings. Add an 'A record' pointing your domain (or subdomain) to the IP address of your VPS. This may take up to a few hours to kick in. After it's ready, whenever someone visits this domain in their browser, that name be will be resolved to the correct IP address so that requests can be routed to your VPS where your app will then respond.
Now that the production environment is set up, repeat the above steps but deploy a Staging version instead inside the staging environment of the project. For this one, set the Git branch to staging (you may need to create this branch first). Also, the first two environment variables should be updated:
Accordingly, when setting up your domain, use the staging subdomain. You also want to lock the staging environment with some basic auth so that it's not publicly accessible. Go to the 'Advanced' tab, find the 'Security' section and click 'Add Security'. Then create your credentials. Now, whenever the staging domain is visited, it will require those credentials to be entered.
Your branch-based workflow
Now is a good time to discuss your branching strategy. For solo / small-team development, I recommend following a Github Flow-inspired workflow as follows.
Any pushes or merges into the staging branch will auto-deploy to staging. A staging environment is ideal for testing features in a production-like environment. When working, ideally create a feature branch (feature/*) from staging, then open a pull request (PR) into staging when ready. If it's something small, you could also just work on staging. Then once you've checked that the staging environment has no for issues, you can merge staging into main via a PR. That will automatically trigger a deployment to production.
In summary, main is always stable and production-ready. staging may contain newer changes that are still being tested. Finally, your feature branches are in-progress work. It's important that main is always behind or equal to staging. If possible, protect your main branch on Github to ensure that this is the case. Unfortunately, this setting is not available for private repositories on Github on the free plan.
It's also good to follow a structured format for making commits such as Conventional Commits to ensure that your commit messages are consistent, readable and meaningful.
Compression
Responses coming from the server should be compressed for faster load times and lower bandwidth usage. You can check this by entering in your URL at GiftOfSpeed. Handling compression is technically possible at the application-level but since Node.js is single-threaded, it's not ideal for performance. Instead, it's better to handle compression at the reverse proxy level.
Traefik is an open-source reverse proxy and load balancer designed for microservices. Dokploy integrates with Traefik out of the box. However, it doesn't automatically add compression. We need to add this to the Traefik config manually.
Go to the 'Traefik File System' page and navigate to the 'dynamic' folder. Go to the middlewares.yml file and the following middleware:
Next, you should see a separate yml file for your staging and production app. Look for the router that includes 'websecure' in it (this means the router is listening on the HTTPS port). Under 'middlewares', add compress-all@file. Make sure you do this for both staging and production environments.
If you now re-check GiftOfSpeed, you'll notice that Brotli compression is applied to your website. Brotli is a compression algorithm that produces smaller files than Gzip (another popular compression algorithm) although it is slower to compress. Brotli is supported by all modern browsers.
Set up Analytics with Umami
Umami is an open-source, privacy-focused web analytics tool. It's essentially a self-hosted alternative to Google Analytics. Umami tracks basic metrics about your website such as page views, unique visitors, geographic location, time spent of page etc. Unlike Google Analytics, it doesn't track or store any personally identifiable information like IP addresses, cookies or user profiles. It is GDPR compliant.
Let's set it up. Go to your project and create a template, selecting the 'Umami' template. Then go inside and click 'Deploy'. You should also configure a domain for this (e.g. 'umami.your-domain.com') in the 'Domain' tab similar to before.
Once you visit the Umami URL, you will be prompted to login. The default username is admin and the password is umami. Once inside, go to the 'Settings' page, then 'Users', and change the default username and password.
Next, let's configure the website. From the 'Settings' page, go to 'Websites', and click 'Add Website'. Then fill in the app name and domain. Once created, click 'Edit', and copy the tracking code and paste it in the head section of your HTML inside PageMeta.svelte. This should not be present in the dev environment.
Scale the app
When you start noticing your app gaining traction in Umami and see resource usage climbing in Dokploy's monitoring page (or from your VPS provider's monitoring page), it may be time to think about how to scale to handle the increased load. You can do this via vertical and/or horizontal scaling. Vertical scaling involves adding more resources to the same server i.e. CPU, RAM, storage and bandwidth. You can easily do this by upgrading your VPS via your provider. Horizontal scaling involves adding more servers or instances that each run the app. This scales better in the long run and provides the benefit of fault tolerance.
There's two ways you can do horizontal scaling:
Run multiple instances (replicas) of the production app on the same server. This allows you to take advantage of multiple CPU cores which is especially useful for single-threaded runtimes like Node.js.
Distribute your production app across multiple servers (nodes), managed by a container orchestrator called Docker Swarm. This provides higher availability as your app remains accessible even if one server fails. It also offers better scalability as you can handle increasing traffic by simply adding more servers. In essence, you are spreading the load across multiple nodes in a cluster rather than relying on a single machine.
The first option is much simpler to set up. Simply go to the 'Advanced' tab in your production app and select the number of replicas under the 'Cluster Settings' section. For the second option, follow the instructions in Dokploy's docs.
Last updated